Searches and Baby Carriers

As we welcome to the world and bring home our second child from the hospital I was reminded again about baby carriers and how parents will place just about anywhere. 

IMG_2002.JPG

Just a few quick pics here from our first kid and where I have set the baby carrier down leaving her in there. Sometimes it's because they are asleep and we just want to enjoy a few peaceful moments before he crying begins again. My daughter loved being in the carrier and being swung gently back and forth. I used this tactic many times to calm her down. 

Other times we may leave them in there for a moment while we run back out to the car to grab the groceries or backpack number 2. Either way the baby carrier ends up all around the house both occupied and unoccupied.

If you find one, be gentle with it. A newborn may only weigh 6-8 pounds and with the adrenaline flowing that will feel like nothing. 

Get it off the table and low to the ground! This gets it in the cleanest air available to it. 

Once low, get your face in it to see if visibility is enough to actually search it with your eyes. 

IMG_1986.JPG

Don't just glove the inside hard, you may injure the child even more or rub whatever is on your glove (broken glass etc.) on the kids face. 

When in doubt, take the whole thing outside! Don't risk it. 

If it is empty, be thinking that there is a baby inside somewhere. We have 2 baby carriers, one for each car. Typically only 1 is inside at a time. The other is in the other car. 

Now this gets a little advanced and some may think I am off my rocker but if you find a baby carrier in a social room and it's empty to be afraid to take it with you towards the bedrooms. If you find a baby in a crib or bassinet this carrier can be used to help you get it outside safely! I'm not saying you need to fasten the buckets and everything but setting the kid inside will protect the kid's head and neck more than our clumsy and bulky gloved up hands and coat covered arms. No one wants to face rake a newborn with their chest mounted flashlight!

If you got this far, thanks for reading all the way through!

Garden Apartments: Labeling Floors & Unit Numbers

Garden Apartments:

Trying to use unit numbers to help label your floors can lead to confusion.

Screen Shot 2019-08-26 at 9.22.30 AM.png
Screen Shot 2019-08-26 at 9.23.14 AM.png

Looking at your typical 1950's-70's era Garden Apartments we will see something like what is in the pictures below, 3 floors in the front and 4 in the rear. 

Typically, we should be labeling the floors from the outside. On your alarms and calls with nothing showing you may feel an urge to wait and get inside to label so you can correspond to the unit numbers. But this can be confusing, and here is how. 

With the main debate being how to label the lowest floor. Basically, there are 2 choices, Terrace or 1. 

What is hard to tell from the outside is how the units are labeled on the inside. A good guess based on the pictures would be the units on the lower floor would be labeled with a “T” for terrace. In many cases the units will be labeled as a "T" unit on the lowest floor designating it terrace level unit and then work up from there. The upper floors being labeled in the tens or hundreds. Example being 1stfloor units labeled 11, 12 etc. or 101, 102 etc. 1 This makes it easy to label the floors Terrace, 1, 2 and 3 so the floor numbers coincide with the unit numbers. 

However, the units in the pictures here are labeled #1 and #2 on the lowest floor, #10, #20, #30 and #40 on the next floor up, #101-104 on the floor 2nd to top and #201-204 on the top floor. So, in this case because the unit numbers only go to the 200's we are left with 2 floors needing to be labeled appropriately. 

In this case what would you label the first two floors to coincide with the floor number? To me there is no good way. So, if we abandon trying to use the unit numbers, we can make life easier!

If we label this building Terrace, 1, 2 and 3 the unit numbers and floors will not coincide. This is ok if we abandon trying to use the unit numbers. Instead, label the units by what quadrant of the building they are in rather than trying to orient by floor and unit number.  Now this building becomes simple. There are 4 units per floor and 4 quadrants per floor. This allows us to start labeling the building on arrival without the need of any extra information from the inside, thus eliminating what could be a lot of confusion. 

Example: “E307 on-scene 3 story garden apartment, nothing showing” “BC33 from E307, 360 complete, 3 in the front and 4 in the rear. We’ll label the floors Terrace, 1, 2 and 3.”

Just some quick thoughts this morning. Be hard to kill!


Commercial Rooftop Ventilation Quick Read

Purpose:

Vertical ventilation is a tactic used to release smoke, heat and fire gases from the interior of the building by means of the physical properties of the materials being released. Meaning, bad things are hot, heat rises and the roof is where we can create an exit for them. This release may help improve conditions for crews below conducting interior operations. It is important to remember that a fire can not be extinguished with ventilation alone, and ventilation must always be coordinated with fire attack. Improperly timed or poorly placed rooftop ventilation can potentially have a negative effect, creating a new exit point and drawing increased oxygen to the fire. 

Reminder:

Screen Shot 2018-05-21 at 10.32.19 AM.png

Once on the roof find and plan for a secondary means of egress. The seemingly accepted myth that peaked roofs are dangerous and vertical ventilation should be avoided but flat roofs are safe and can be operated on is false. Flat roofs are made of multiple different materials including wood, metal and concrete. Any roof with fire under it, no matter it’s shape, has an associated risk when being operated on. Do not assume that because you are operating on a flat roof you have more time to accomplish the task. Lightweight steel bar joist roof systems are prone to failure with little warning. At 1000ºF steel will twist and expand, causing failure.

IMG_1438.JPG

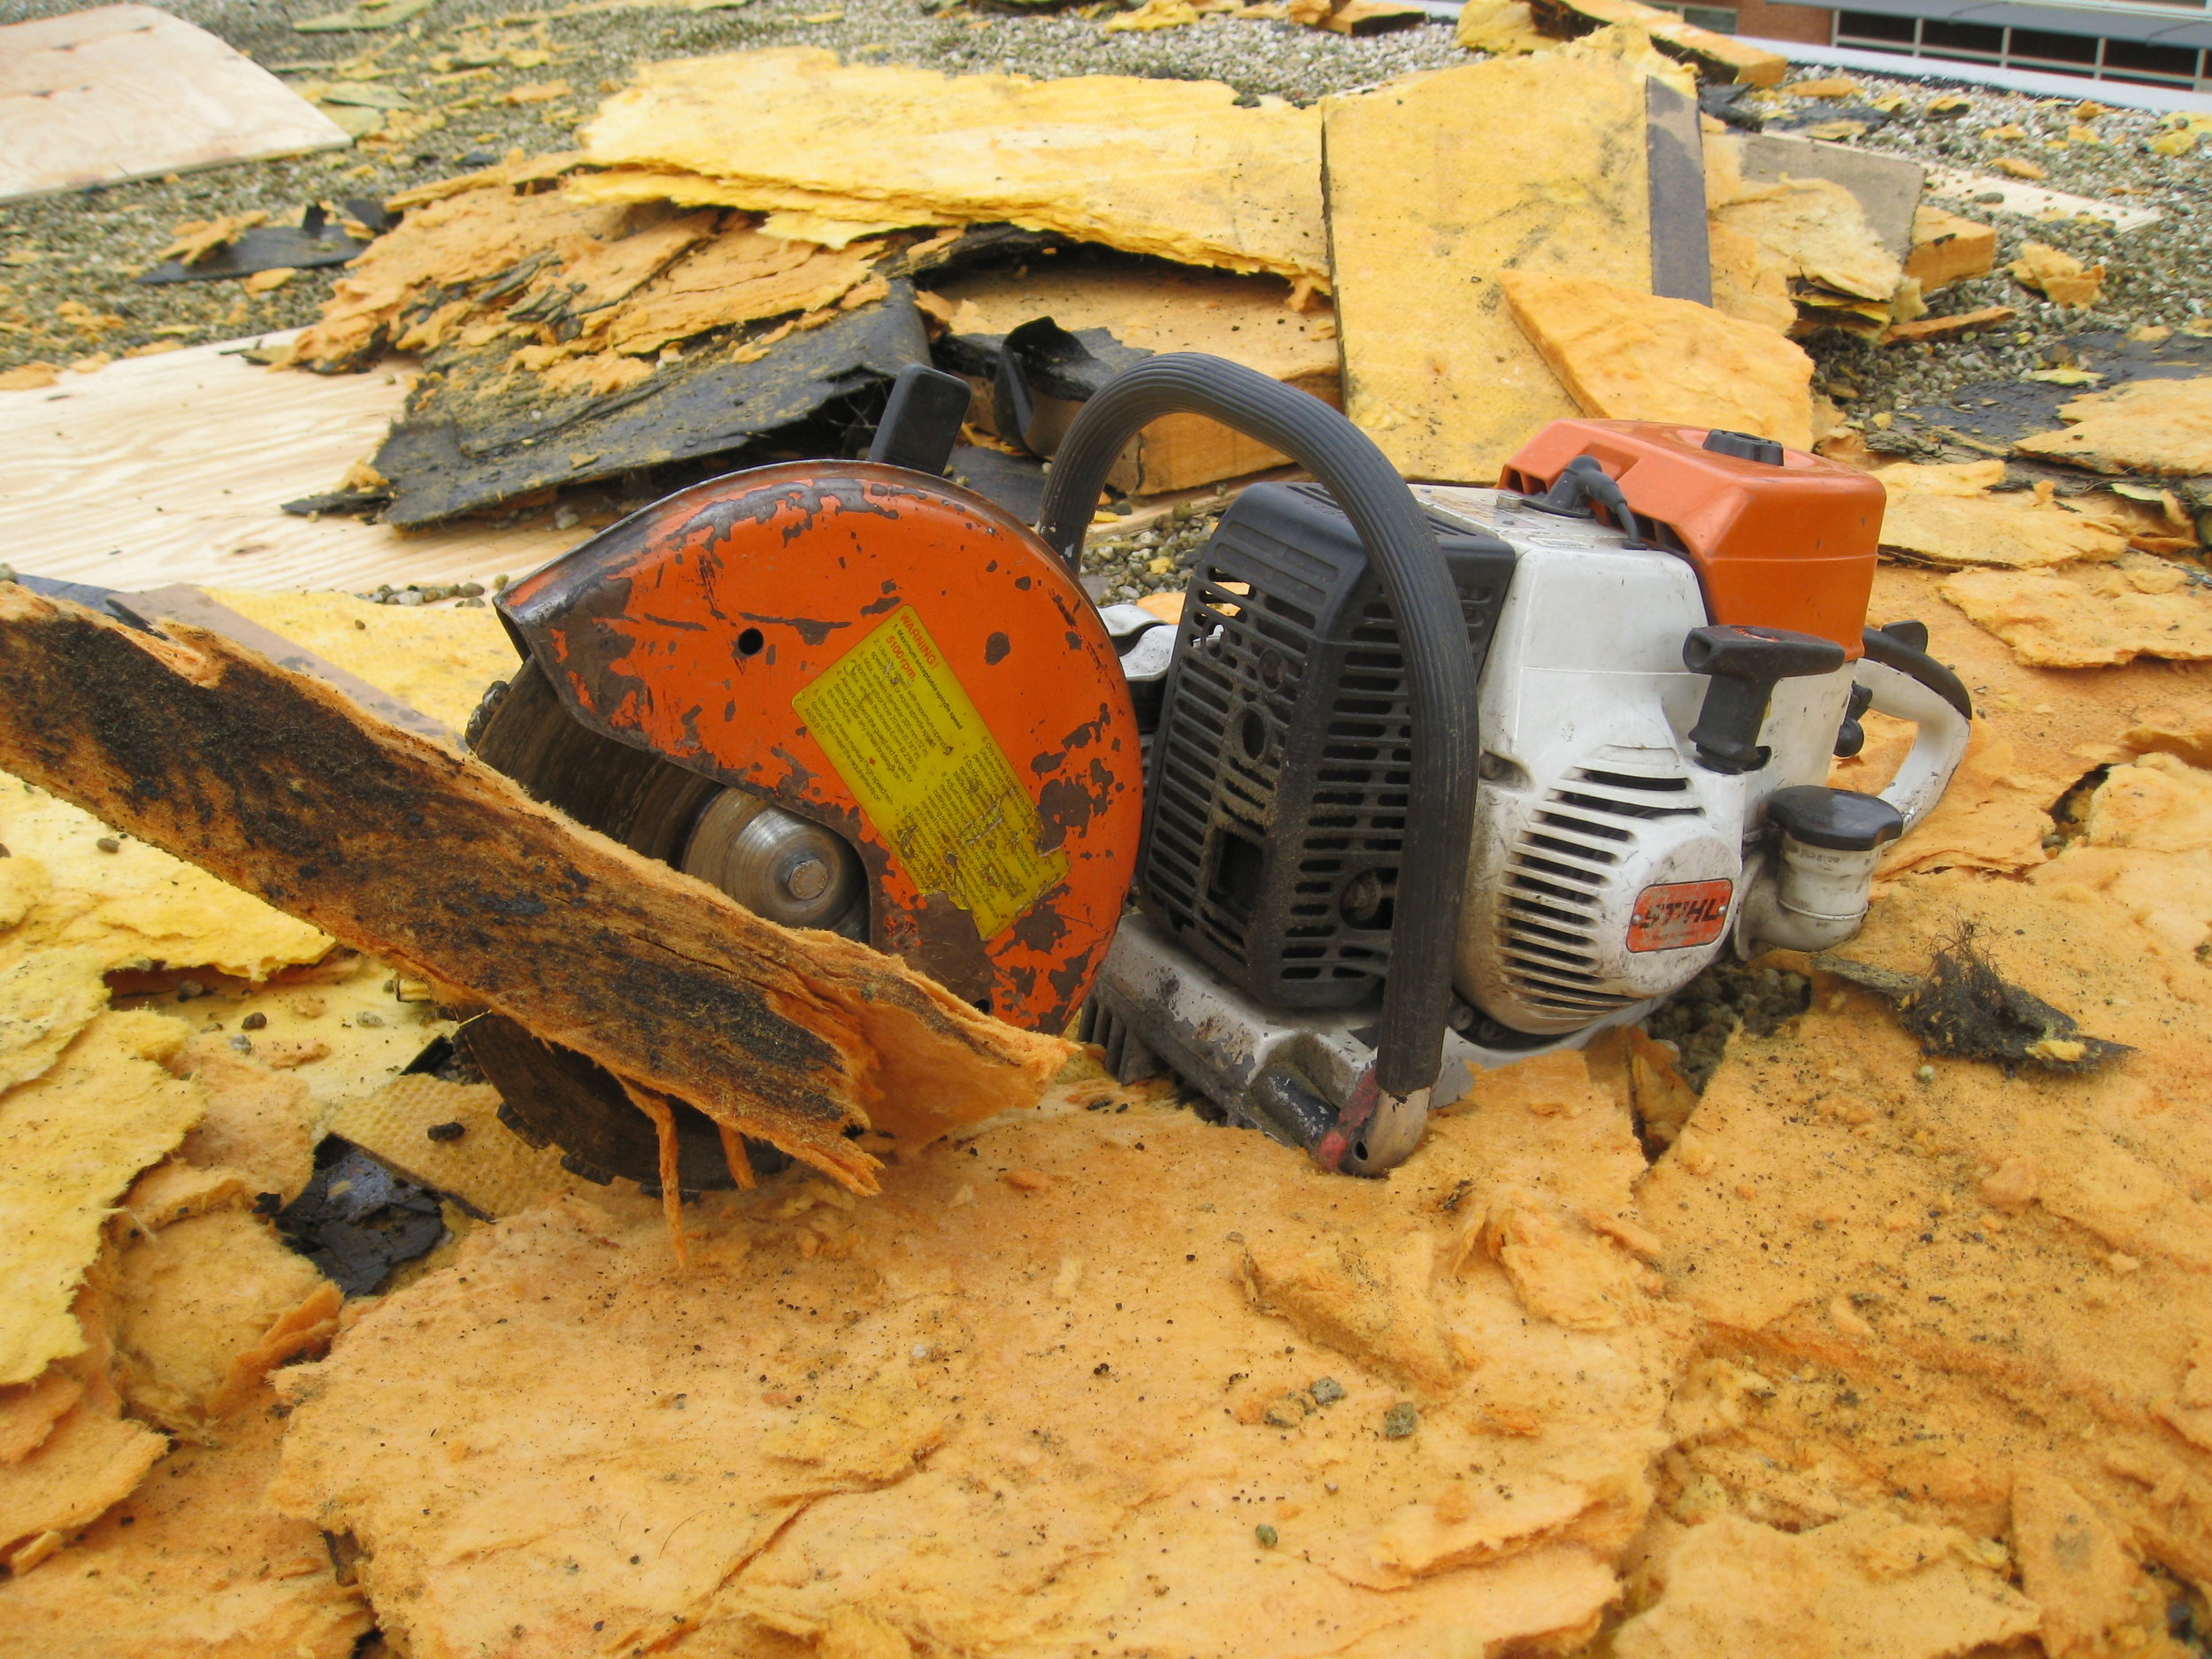
Power Tools Needed: Ventilation Chain Saw, Rotary Saw w/ metal cutting blade

Hand Tools Needed: Axe, 6’ NY Hook, Trash Hook, Halligan Bar, Utility Knife (used for cutting rubber roofing membranes)


Instruction:

Opening up already existing or natural vent points is a way for the roof crew to start releasing smoke, heat and fire gases from the interior of the building with little resistance. Scuttle covers, skylights, ventilators and exhaust vents are all examples of quick and effective ways to vent a commercial roof. The crew in the picture below is using the rotary saw with a metal cutting blade to cut and remove an exhaust fan. Some may be mounted on a hinge and can be opened rapidly by simply cutting a lock or latch. A skylight will typically lead to an occupied space below and is a good choice for an easy opening. 

extra vent openings1.png
RoofHatchSkyLightGR_5.jpg
open exhaust fan.jpg

While vertical ventilation on a commercial roof can be manpower intense and time consuming, crews can reduce time needed by preplanning their technique. For instance, a two-person crew can operate more efficiently by working functionally. Meaning, one person is the Saw person and the other the Hook. 

Screen Shot 2018-06-23 at 1.37.33 PM.png
Truck School 2008 004.jpg

With a goal of an initial 4’ by 4’ opening a crew of two can start by using the two triangle method. Each triangle makes up half of the total opening. The 4’ by 4’ original opening can be expanded in any direction by adding additional triangles.  Take caution trying to create too large of an opening as the roofing material is heavy and can be hard to remove. Using the chainsaw, which works best on built-up roofing material, the first three cuts should be those of the outside of the triangle. Before moving on to the second triangle the Saw FF should first make relief cuts (examples shown below as dotted lines) to allow for easier removal of built-up roofing material. 

Truck School 2008 005.jpg

As the Saw FF finishes cutting the first triangle and moves onto the second the Hook FF can begin removing the roofing material. This tactic works well because it keeps personnel far enough apart to continue working simultaneously which can reduce time on the roof.

On a metal deck roof the Saw FF finishes the second triangle along with the additional cuts they can swap out the chainsaw for rotary saw and begin repeating the triangle cuts on the now exposed metal decking. As you progress through the roof expect your hole to get smaller due to the size of the saw and the displacement of the blade. In reality a 4’x4’ hole may end up only 3’x3’ and this is why expanding the hole with additional cuts is a good option.

If operating as a crew of four it may be beneficial to have one Saw FF, two Hook FF’s and one FF bringing up additional equipment (second chainsaw, shovel for stone ballast, etc.). Remember, these roofs may consist of many layers of built-up roofing material. If an extended work time is expected request additional units early to get relief crews started. 


The Box Light

An essential part of a firefighter's load out is a flashlight.  One of the best options is in the form of a "Box Light."  The box light provides anywhere from 2-4 hours of light in the form of a solid beam that can help cut through smoke or illuminate the surface below it.  The box light helps illuminate our presence and can help with accountability.  The box light is a necessity for a firefighter that is performing a search. In addition to what I mentioned above, the box light can be left at a door, on top or bottom of the stairs, or at the bottom of a window during VEIS to help with orientation with in the structure.  Using the box light to sweep below the smoke helps illuminate the area we are about to commit to, gives us a better look at the floor lay out, and can help pinpoint victims or hazards. 

Anytime we run a call at night a box light is a must, whether it be EMS, public service, etc.  Having that light can help you read house numbers, spot tripping hazards and illuminate the area you are working in.  There are several brands available some have halogen bulbs others are LED.  The LED's are brighter however the halogen doesn't reflect back off the smoke as much as the LED's do, it does a better job of "cutting through the smoke."   Its all about personal preference.  I choose to carry the Advanced Lighting Corporation FD 1 LED hand light.  The FD 1 series of box lights has been the standard issue box light for the FDNY for close to 30 years.  It's rugged, simple and very reliable. 

I added a couple of things to my light that make it more functional for me.  First I wrapped the handle with O2 tubing and grip tape to make for a non slip grip that helps with having gloves on. The second is I attached a diving knife in a scabbard to the front of the seat belt strap just above the release buckle.  I added this as an additional measure to assist me in cutting my way through an entanglement.  I wear the light across my body under my SCBA at waist level with the light hanging by my right hip.  Some use a carabiner, "light drop buckle" on the SCBA waist belt, or wear it up high under their arm pit on a strap.  Whatever method you choose, develop a system that works for you and TRAIN with it.  Get used to having that box light on you and practice your searches, forces, ladder throws and hose stretches with it.  That way you will be comfortable with it when it's time to go to work.  Practice turning it on and off with your gloves on and removing it should you become entangled, then putting it back on once you are freed.  If you don't use one, try carrying one, if you currently use one keep building your skills and confidence with it!  

Be safe and be aggressive - Puzz

The Purpose of Training and Training With A Purpose

When is the last time you had a productive training session? Are you training with a purpose? I would hope we can all say we train minimally on a semi-frequent basis. But are we training the right way? Are we really “training” or just are we just spinning our wheels? As they say… “A rocking horse keeps moving but it doesn’t make any progress” Here is an example.

Sitting around the table the other day at the volunteer house, one of the newer members asked for some help with his “Rookie Book”. Another member, with only about one year in, jumped at the opportunity to showcase his own skills and suggested they pull some hand lines together. Being a huge advocate of only one lead instructor I saw this as a good opportunity for me to sit back and let the one year guy show the newest member a few things that he himself had learned in the past.

I watched these two deploy the cross lay several times to a side door on the firehouse, simulating the front door of a dwelling. I watched as they took their time on each stretch, consistently finishing evolutions with kinks in the hose. They paused when things weren’t going right and took their time through each evolution. After about 45 minutes, they had completed what they thought was a successful training session.  I was excited to see these two new members motivated (self-motivated, at that) to train, however I could practically see the skid marks from the wheels they had just spun for the past 45 minutes. Zero productivity. I had just watched 2 guys stretch a 200ft 1 ¾ cross lay across an empty parking lot, to a side door with zero obstructions. They were not wearing PPE, the scenario (or target of the stretch) never changed, and there was zero  sense of urgency. On top of that, when they were done they felt accomplished! They did not recognize the fatal flaws of non-productive training. I applauded them for the effort and repetitions they put in but if we are only conducting bad reps then bad results is what we will get.

Let’s think about this for just a second. An hour from now, these same two FF’s could quite possibly be first-in on a dwelling fire. With the engine parked 50’ from the door, they now have to manage a 200ft hand line with only 50’ to flake it out. They will possibly (probably) have to flake it around parked cars, bushes, railings, fences, with an unknown number of potential pinch points. Throw this together with fire showing or a report of people trapped (that sense of urgency I mentioned earlier) and these two are bound to fail. We would then sit back and say “Why was this such a bad stretch?” or “What went wrong?”, “We have trained with hand lines before, they pull lines on their own all the time…Right?!”

I asked myself what the purpose of this training was. Who did this benefit? Where did the idea to train like this come from? Sure, pulling hand lines is great and not every scenario needs to be a back breaking, hose humping exercise, but this? This was garbage. After the training I pulled the leading member aside and asked about his training. His answer was simple …“Well, it’s just what I have always done”. Lightbulb moment for me. I remembered a quote by Jocko Willink; “…if substandard performance is accepted and no one is held accountable—if there are no consequences—that poor performance becomes the new standard”.

Bingo. This instructing member, with just one year in a volunteer department, has little to no actual fireground experience. Everything this person has ever learned about stretching hand lines has been in an empty parking lot. This mentality, this poor training, was all taught to him by…US. We are the ones who have led him through this same training in the past. We have trained him to this new substandard level. This is the normalization of deviance! We have become so accustomed to this type of training that we no longer recognize it as substandard. He now took these habits, this new standard of training and is passing it on to others. A recipe for disaster.

Members conduct simple hose deployment but are wearing full PPE and SCBA to add realism. The evolution used this entrance door in reverse to add obstacles to deploy around. The "inside" of the structure was the actual outside.

Members conduct simple hose deployment but are wearing full PPE and SCBA to add realism. The evolution used this entrance door in reverse to add obstacles to deploy around. The "inside" of the structure was the actual outside.

How do we fix this? How do we stop this dangerous snowball from continuing to roll downhill? Simple. Be the change you want to see. Find the knowledge and become the instructor you wish you had as a new firefighter. Knowledge is not passed through diffusion or osmosis. Learning and teaching are activities requiring engagement from both sides. 

Start leading more realistic training sessions and get as close to that real life scenario that we are bound to one day face. Stretch around obstacles, change your point of attack, throw on some PPE, and change up the scenario. Finally, probably most importantly, change your mindset. Train with the mentality that you might face this scenario one day because chances are, you will. When you do this, when you start training with the right mentality and a purpose, others WILL follow. The guys you train with will then also start leading more realistic and productive trainings. Over time, that new standard will be one that you can be proud of.  Hold yourself accountable, excel in your training, and train like your life depends on it. It does.

For more information on how to conduct reality based training check out Training at the Speed of Life by Kenneth R. Murray. In this training manual the author describes both the science and need behind realistic training scenarios and repetitions for successful real life results.

-Ryan

What's in your pockets Wednesday? Cutters...

So today let's talk a little bit about cutters. What kind do you carry? Side cutting pliers (lineman pliers) or high leverage cable cutters (crescent moon shaped cutters)? Have you altered or improved them at all? What pocket do you carry them in? Have you practiced reaching for and using these cutters? If you have practiced with entanglements have you ever been allowed to use your cutters or told not to because people did not want to replace the cut wires?

All of these things matter! If you threw a pair of cutters in your pocket because one day someone told you it would be a good idea congrats, your about 30% of the way there. If you have never put any though into how or why you carry them when you do, please take a moment this week to do just that. Get out there and practice reaching for, removing and using this tool in zero visibility with both hands, one hand and your weak hand. Who knows, when you need them it may be due to a collapse and your good hand no longer works right. 

Take a look at these cutters, they have a spring added in between the handle to make the one handed operation much easier by eliminating the need to manually open them up. Also, there is a rope to a handle which make removing them from your pocket easier. 

Over the years I have carried different style cutters moving them between all of my pockets. For a long time I carried them in one of my lower coat pockets. Then one day when a few other instructors and I were putting each other through survival scenarios we had designed for a course I had to reach for and remove them from my pocket. It was extremely hard due to the thinness of the pocket cover and the waist belt of my SCBA. Now I carry them in my chest "radio" pocket. I say radio in quotes because I carry my radio on a strap under my coat but everyone still refers to that pocket as where the radio is supposed to go.

For a while I settled on a pair of side cutting pliers. Why? I had heard that the cable cutters had a hard time cutting through thin wires, they had a tendency to bend between the blades instead of cutting. Did I try them out to see? Nope, just took the information and ran with it. Turns out it is semi true but not impossible to cut thin wire with them. It is however very hard to cut thicker cable with the side cutters so those were pulled and replaced. Now I carry cable cutters. 

The other day I thought to myself that I had not checked the cutters in my gear at my volunteer firehouse in a while. Just as I suspected, they were rusted shut. A lot of help they would be when I really needed them right! Things happen but that's no excuse. "Excuses are the nails that build the house of failure!!" -Papa T. 

So I spent some time and cleaned them up and back to work they went. Key is, it is the little things, attention to details. Sometimes it is easy to forget especially in the busy lives we lead but the little things are the things that make or break the situation. Take a moment out of your day and check you cutters, make sure you have enough chocks in your pockets...

Anyways, enough of my ramblings for now, stay frosty and be hard to kill!

-Jim

The Door Chock

This article started off as a What's In Your Pockets Wednesday? Facebook post but there was just too much good advice to cut it down so we turned it into a full article! Thanks to Chris Puzzanghero and Clint Cardinale for their input and advice. The article covers both a truck company firefighter's and an engine company firefighter's point of view. Keep in mind there are many types of chocks and while they can be all be used for similar tasks they also can have specific uses. Take for example the aluminum chock is a better fit for using as a wedge during forcible entry. While it is a good start to throw a bunch of chocks in your pockets, take the time to think about how you use them, where you keep them in your gear and if each chock has a specific use or not. 

There are many types of door chocks and they all have their purpose. 

There are many types of door chocks and they all have their purpose. 

The wooden door wedge or "chock" as it is commonly labeled, is one of the simplest and most effective tools we as firefighters can carry.  They are cheap, easy to make at the fire house and versatile.  Whether you are running the line on an engine company or carrying the irons on a ladder company, the wooden chock's usefulness is limitless. It's two main functions though are to help force a door open and then to keep it from closing on a hose-line.

 
2 wooden chocks in the radio pocket. 

2 wooden chocks in the radio pocket. 

I spend the majority of my time at work on a ladder company and carry several wooden chocks in my gear, mainly for forcible entry.  I have found that carrying two large wooden chocks in the radio pocket on my turnout coat to be the best place for them.  I wear my radio on a strap under my coat which frees up the coat pocket to carry my two large chocks and my cable cutters.  By having two large chocks in my radio pocket they are easily accessible and securely stored until needed. I like keeping them here because I can easily grab the chocks with a gloved hand and pull them straight out of the pocket for use and put them right back when done. 

This is extremely effective for forcible entry, as the two large chocks can be quickly deployed to capture progress while forcing a door. The chocks can also be quickly put back after the Halligan bar has been re-positioned on the door to continue the force.  This frees me from worry about the chock falling out of the door and having to pick it up off the ground. I may need it to continue the force. Having to hold the Halligan in place, get down on the ground, pick the chock back up and hold on to it while forcing the next lock that is holding is not efficient nor easy, especially in lower to zero visibility. The chocks can be taken in and out of the radio coat pocket gloved up with ease. 

 Another reason why I keep the large chocks in my radio pocket is our coats are a longer cut. They extend well over the turnout pant cargo pockets which require the bottom of the coat to be lifted up in order to access the Velcro flap on the pant pocket which is not ideal. The turnout coat pockets can present a similar challenge with the SCBA waist belt getting in the way of the pockets opening. Try storing a large chock in the radio coat pocket and see what you think.  

- Puzz

Door chalks, door chalks, door chalks!  I can't say it enough, door chalks. They are cheap (free) light and have countless uses. If you are riding an engine you should have a pocket full of door chalks and 1 chock in each pocket. This insures that your hand line is not compromised or inhibited by free moving doors. But how many is enough? I always go with some advice my old boss told me, as a line firefighter you need 5 door chalks. His logic: the most doors you are going to need to chalk will be in mid-rise commercials and/or apartment buildings: 1 for the front door, 1 one for the other side of the vestibule, 1 for the bottom of the stairwell, 1 for the top of the stairwell, 1 for the apt/fire room door. All told 5 door chalks. 

- Clint

Do You Trust Your SCBA Emergency Procedures?


Last week we posted the LODD reports from a fire in Baltimore County, MD in 2013. You can find Gene’s NIOSH report here and the Interdepartmental Investigation here.  Take a look at both and let the facts presented soak in. A lot of very good discussion came up and I hope that people were driven to the reports to learn what we can. Unfortunately we will never know exactly what happened on the second floor of that house on that fateful night. There are many ideas or theories which are plausible, some more likely than others. At the end of the day we will each settle on our own opinion of the truth and that is ok. What I would like to focus on for the sake of argument is one possible reason FF Kirchner was overcome by smoke that night. Follow along until the end and see if it makes sense to you.

Scott AV 2000 with Exhalation valve on the left side respective to the mask. If you look close you can see the red valve seal.

FF Kirchner's face piece with missing exhalation valve. Picture from Baltimore County internal investigation.

Do you trust your SCBA Emergency Procedures? I ask you this because I am going to try and connect the dots which neither of these reports had the freedom to do. FF Kirchner was found in a second floor bedroom with the door closed, his face-piece, helmet gloves and hood all removed. His SCBA bottle had been turned off. It was found on the floor of the bedroom he was removed from. So what happened? What would drive a fairly seasoned FF to remove all of this equipment while performing a search for a reported victim, on an upper floor knowing all along that these pieces of equipment keep him alive? Take a look at his face-piece. He was wearing a county issued Scott AV-2000 series face mask with an exhalation valve located on the left side of the mask. When his equipment was recovered, the exhalation port was empty. As noted in the internal investigation, “During the inspection of the turnout gear and SCBA on June 3, it was discovered that the exhalation valve was missing from the face piece. Per police reports the exhalation valve was recovered the next day from the bedroom where Firefighter Kirchner was found.”

One theory is that this valve came out during the removal process. His mask however was not on him when the FF from E56 found him. I would argue that the valve actually came out during FF Kirchner’s search. More on this in a minute.

Another theory is that FF Kirchner never clipped his regulator into his face piece when he entered the building. Possible, but highly unlikely. There were fire and smoke conditions on the first and second floor. That would mean he would have had to hold his breath from entry until he made it upstairs. If you follow the timeline of radio traffic you will see that there is at least 3 minutes of time from when E56 and FF Kirchner entered the front door until the PASS alarm is heard. I know 3 minutes is not a long time but I ask anyone reading this to hold their breath for 3 minutes while conducting some physical activity. Not likely possible.

So what if it was something else? What if, in that particular mask set up, when the rubber in the valve warmed up from heat it became much easier for it to be dislodged? The reason I go down this path is I have personally had this same exhalation valve on the same series face mask partially dislodge during flashover simulator training. After the mask and myself had been in the simulator for a fairly short period of time it had accumulated heat soak, warming the rubber valve up. Because the valve extends away from the mask about an inch, it is easy to brush up against something, which is what happened to me and partially dislodged the valve. I noticed this happen and quickly exited the simulator loosing positive pressure air while I exited. When I brought this up to an instructor I was informed that this actually happens sometimes and if you run it under hot water to warm it back up will pop back in. Being younger, less informed and less thoughtful of how bad this actually was, I followed those instructions and that is where it ended. Amazingly enough this same mask passed yearly fit test evaluations for approximately 4 years after the incident. Makes you wonder…?

Now I ask you, what are your current SCBA Emergency Procedures for dealing with a regulator free flowing air? I can tell you what ours were when I went through FF1. If you experience free flowing air from the regulator follow these steps:

Following these steps, if controlling the purge valve does not control the leak you then move to control the leak by turning your cylinder off. It will take a few seconds to breathe down what is left in the system and then as it gets low you can crack your cylinder valve open and close it again quickly. These steps were originally developed to conserve air. It was assumed that the reason your regulator would be free flowing air is a malfunction of the regulator, not a hole in you mask. In a zero visibility environment with full PPE and fire gloves and a little bit of extra stress due to the malfunction it might not be that easy to diagnose the problem.

Now put yourself in FF Kirchner’s shoes. You are part of a search crew going above the fire to look for a reported victim. The occupancy is filled with debris and has the makings of a hording environment. During the search your notice you are free flowing air from your regulator. Following your procedures you check your purge, which does not solve the problem. So you move to the next step and close your bottle down. BOOM. Your next breath is filled with hot, sticky, smoky shit. You panic. You followed your training perfectly and now you are in a situation you were never told you would be in. Only a few breaths after panic and frustration have set in you have now inhaled enough CO to alter your decision making ability.

Not one of the recommendations or contributing factors in either of the two LODD reports above mention this. NIOSH writes “The initial evaluation by the contractor (SCBA Evaluator) revealed that the facepiece was missing the external exhalation valve on the left side. An external exhalation valve was recovered by the police investigators the next day in the bedroom. When the SCBA was tested by the external contractor with the external exhalation valve reinstalled the SCBA pass all tests except for the high pressure leakage. The positive pressure system worked properly.” They do not lend anymore details to the “high pressure leakage.”

Two things from this statement. Being that the positive pressure system worked properly, if the external exhalation valve had become dislodged while performing a search then FF Kirchner would have had free flowing air from his regulator giving him a reason to follow the above emergency procedures. Also, I could not find out any more info on what the “high pressure leakage” test is.

NIOSH does not hypothesize why the external exhalation valve dislodged and separated from the facepiece. However they do hypothesize why FF Kirchner removed his mask stating “In this incident, the victim apparently experience an SCBA emergency and went into a near-by room to try and fix the issue by removing his facepiece without the knowledge of his partner. It is assumed this is where they (FF Kirchner and his partner) became separated. The victim was overcome by the toxic conditions and his PASS device was heard by the engine crew at the top of the stairwell. The victim’s external exhalation valve was later recovered in the bedroom.”  Why take us down one path if they were not ready to take us down all possible paths that lead to this tragedy? I don’t know and we probably never will.

What I ask of you is this, since you have taken the time to read this far, now take the time to review this incident with your crew. Talk about the recommendations and contributing factors because they are worth it. But take your discussion one step farther and talk about the things no one mentions! Talk about how nothing in the fire service is 100% for certain. SCBA emergency procedures are just that, for emergencies, and the fact that we are using an SCBA means we are already in a hairy environment. Take a look at your SCBA emergency procedures and ask yourself if they are right. Consider the idea that your procedures need to be amended.

I offer you this. We have since changed our emergency procedures and eliminated closing the cylinder. Basically if you have a SCBA malfunction, notify your partner, call a Mayday and get out of the IDLH. It is simple and it keeps our life sustaining air from being turned off. There is no one solution for this scenario. We can Monday morning this all day long. Each building and each fire will present different situations and decisions will have to be made. One key is to train to keep our brain engaged in the fight, keep making decisions based upon your reality.

As firefighters and emergency service personnel we are used to solving other people’s problems. We spend our days war gamming, pre-planning and coming up with solutions for different situations, always trying to be prepared. All of this is good but we have to remember we operate on the edge of control, somedays we have it and other days we have the illusion of it. We operate in the boundaries and as James Gleick has said in his book Chaos, “strange things happen near the boundaries.”

-Jim


Training Opportunities


Training Opportunities

My ninth grade social studies teacher would put a quote of the day up on the chalk board every morning. One of my favorites which would make a recurring appearance was “Excuses are the nails that build the house of failure.” Now I don’t know if it was an original quote or if he borrowed it from someone else but it for sure had an impact on my life and for that I thank him!

“Excuses are the nails that build the house of failure.” Think about that for a moment. Think about how many excuses you have heard today or maybe even how many you’ve given to others today, both in life and at work. “It’s too hot to train today.” “It’s too cold to train today.” It is always too “something” to train everyday if we allow it to be.

We run fewer fires per person today than in generations past and the fire-ground has sometimes become overly complicated. The fire service has taken on a role of being problem solvers. We handle all types of emergencies and many times the training for the High-Risk, Low Frequency events takes priority over the High-Risk, Medium Frequency events. This means we should be training more than ever. But training how?

Sitting at a computer 4 hours a shift droning through PowerPoints or even articles like this are helpful but not the solution. The fire service is still a hands on environment. Which means most of our training should be hands on.

Now I know our whole day cannot be dedicated to training. We have calls to run and life situations to handle. What we can do though is keep our eyes open for the training opportunities that we pass up all the time. When I was a newly appointed volunteer lieutenant I asked my father for some advice. He has spent the last 42 years of his life as a volunteer firefighter, fire-line officer and chief officer. I asked him how he, as a young officer, was able to accomplish his training goals. He told me to keep my goals reachable. He mentioned how he would run short, quick drills on the way back from calls. They were quick and efficient, as simple as finding a building of opportunity and running a line or throwing a ladder. I took this advice and put it to use both at work and at my volunteer house. The beauty of this technique is you won’t have to spend as much time motivating individuals to train because they are already out and riding around.

One other great training opportunity is on actual calls. How many times have you watched crews downplay their actions on a fire call? Not stretching a line on a box because it’s dinner time and it smells like burnt food. Not laddering all windows because it’s just a small contents fire. I was always taught that we play it as a fire until we prove it’s not because as someone once told me, and science has proven, we don’t rise to the occasion we sink to the level of our training. If we don’t practice going all out then when the time comes we won’t be ready to go all out.

What’s the answer? Pull lines on fire alarms, odors, even CO alarms and throw ladders to all sides on contents fires. Why? The residents deserve our best effort and the training value. How many residents in your community would let you roll up on their property for no reason and practice running lines in their yard? Probably not that many. However when they call us they expect us to show up and go to work. So go to work!

It is easy to feel overwhelmed, throw in the towel and save it for another day. It happens. When I start to feel this way I try and remember that quote from my past and make it my attitude for the day. “Excuses are the nails that build the house of failure.”

-Jim